Ask any rugby player which spot on the field is the toughest, and you’ll get a dozen arguments—and even more bruises to prove their point. Positions aren’t just about where you stand; each comes with its own pain, pressure, and impossible expectations. This isn’t some polite game of tag. In rugby, every player signs up for a unique type of chaos, but some roles crank that chaos up to eleven.
If you’re eyeing up rugby fixtures and wondering where the real battle is, look closer at what different positions go through every match. It’s not always about who gets tackled the hardest; sometimes, the real test is who’s making split-second decisions with half the stadium screaming at them. Want to step onto the pitch and survive the weekend? Understanding each role’s challenge is half the game.
- Rugby's Demanding Landscape
- A Position-by-Position Breakdown
- The Case for Scrummage: Why Hooker Feels the Heat
- Other Challengers: Fly-Half, Flanker, Full-Back
- Tips for Mastering Difficult Rugby Positions
Rugby's Demanding Landscape
If you’ve watched even one rugby match, you know—it’s brutal out there. Unlike sports where players specialize in either attack or defense, every rugby player does both. During a game, you'll see players sprinting, tackling, rucking, and carrying the ball in quick bursts, often covering over 7 kilometers each match. The constant change between explosive sprints and bone-rattling collisions really separates rugby from other team sports.
The real kicker is, there’s no such thing as a break on the pitch. While the clock keeps running, players drag themselves off the ground, reset, and get right back into it. The contact is relentless. Injuries are common, and rugby has high concussion and shoulder injury rates—according to World Rugby, concussion is the most reported match injury, followed closely by shoulder and knee problems.
Every position demands a mix of strength, speed, and a good deal of stubbornness. Some players are built for pure muscle, like the props, who are tasked with shoving through scrums. Others, such as the fly-half, need sharp minds and nerves of steel for fast tactical decisions. And then there’s everyone in between, balancing brawn, brains, and the lung power to keep up through a full 80 minutes. No padding or fancy helmets here: just a mouthguard and guts.
Why does this matter for figuring out the hardest rugby position? Because every position takes a different beating, mentally and physically. What makes a job tough isn’t just big hits—it’s whether you survive the hits, make the right calls under pressure, and keep on running when your legs feel like jelly. That’s the landscape every rugby player faces, week after week.
A Position-by-Position Breakdown
If you really want to know which spot on the field is the most brutal, you have to look at what each player actually does during rugby fixtures. From front row to full-back, each job has its own pain points and head-scratching moments. Let’s break it down, so you know exactly who’s dealing with what—all game, every game.
- Hooker (2): This is the guy stuck between the two props in the scrum, taking on the worst of the pressure every time packs slam together. He’s also got lineout-throwing duties, and trust me, a crooked throw can cost the whole team. It’s physically brutal and there’s zero room for error.
- Props (1 & 3): Life as a prop is just straight-up hard work. These players anchor the scrum, absorb all that physical force, and usually leave with marks on their faces from scrummaging. Props need major bulk but can’t be slow—they're expected to cover ground across the pitch.
- Locks (4 & 5): Height is king here. Locks are lifted sky-high during lineouts to secure possession, but they also have to provide power in the scrum and help at breakdowns. You need strength, stamina, and coordination.
- Flankers (6 & 7) & Number 8: Think of these as rugby’s hitmen and scavengers. Flankers chase down the opposition, make tackles everywhere, and contest for the ball at rucks. Number 8 controls the ball at the back of the scrum and is often in the thick of the action. They’re workhorses—just ask anyone who’s played there.
- Scrum-half (9): Fast hands, fast feet, and a brain for tactics—that’s a scrum-half. They’re the link between forwards and backs, making quick passes under pressure, and must think ahead, always. They get tackled a lot, but their workload is mental just as much as physical.
- Fly-half (10): If you ever see a player looking like they’re carrying the world on their shoulders, it’s the fly-half. They call the plays, decide how the game should flow, and if something goes wrong, they usually get the blame. Decision-making has to be razor-sharp or the team suffers.
- Centres (12 & 13): Centres crash through tackles and break the line on attack. Defensively, they plug gaps in the middle, which isn’t easy with speedy opposition rushing at you. It takes nerve and timing.
- Wings (11 & 14): These speedsters hug the touchline and finish off tries. Wings look like they have it easy, but they can’t afford mistakes—miss a tackle and the other team scores. They also get hammered if a high ball comes their way and they fumble it.
- Full-back (15): Basically, the last line of defense and the team’s safety net. Full-backs field kicks, launch counter-attacks, and absolutely cannot be afraid of taking huge hits. Good ones need nerves of steel and a killer sidestep.
Want a snapshot of how much each position runs, tackles, or works in a match? Here’s what GPS data from recent pro tournaments shows:
| Position | Average Distance Covered (km) | Average Tackles Made | Scrum Involvement |
|---|---|---|---|
| Hooker | 6.4 | 10 | High |
| Prop | 5.6 | 8 | Very High |
| Lock | 6.8 | 11 | High |
| Flanker | 7.1 | 17 | Moderate |
| Number 8 | 6.5 | 13 | Moderate |
| Scrum-half | 7.2 | 8 | Low |
| Fly-half | 6.9 | 5 | None |
| Centre | 7.0 | 12 | None |
| Wing | 7.6 | 6 | None |
| Full-back | 7.9 | 8 | None |
You can see, when we talk about the hardest rugby position, it really depends on what kind of 'hard' you’re talking about—brutal physical battles, nonstop running, or the mental stress of calling the shots. Each job comes with some major headaches, and every single one matters to the team’s success.

The Case for Scrummage: Why Hooker Feels the Heat
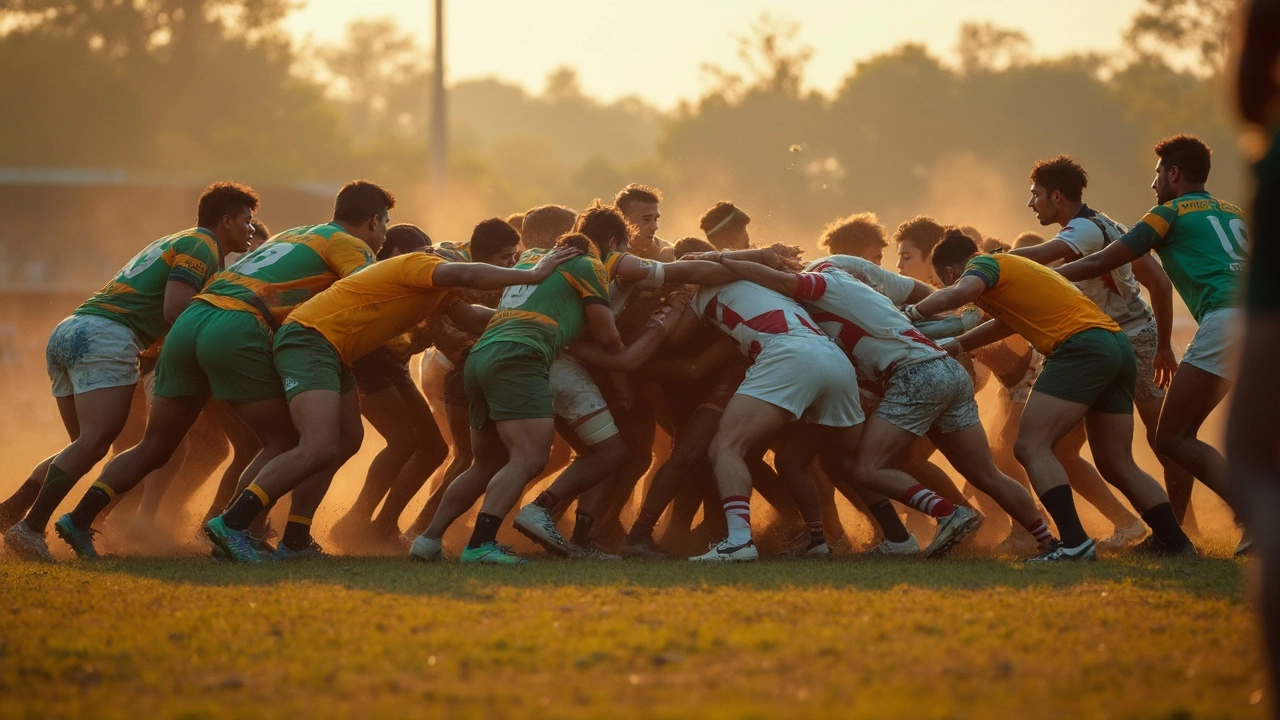
A lot of people who know rugby inside out will point straight at the hooker as the toughest job out there. Think about it—every scrum starts with the hooker right in the dead center, head locked between two giant props, shoulders packed tight, and a stack of angry forwards ready to collapse on top. In other sports, the person stuck in the middle usually gets the blame and the bruises. In rugby, that’s the hooker every single game.
The hooker is the one who drives the scrum, throws in at the lineouts, and has to do all the ugly grunt work. The rulebook even expects them to hook the ball back with their foot under massive pressure, while holding their ground and keeping their neck safe. If you want to see real risk, go back and watch slow-motion clips of a scrum collapsing—neck and spine injuries are no joke at this spot. Few positions combine this much technical skill with straight-up danger.
It’s not just about muscle either. Hookers need an almost insane level of timing and accuracy to throw the ball in at the lineout. One wobbly throw and your team’s plan can disappear in a second. In top rugby fixtures, those throws are the difference between winning and losing. Imagine standing there with all eyes on you, rain pouring down, and trying not to mess up your technique. Even pros sometimes crack under the pressure.
Let’s not forget, a hooker runs more than you’d think. Scrums, tackles, rucks, support runs—their fitness has to be on point. No breaks, barely a moment to breathe. Experience and toughness help, but if you want to last, you’ve got to be quick with your thinking and fast with your feet.
- Most international hookers weigh between 100-110kg (around 220-240 pounds), balancing bulk and speed.
- The average scrum packs a force of around 1.5 tons—hookers take this front and center, every time.
- There’s a reason front-row players, including the hooker, have stricter fitness and medical checks before big games.
If you’re hunting for the hardest rugby position, the hooker isn’t just a contender. For a lot of us, it’s the clear winner.
Other Challengers: Fly-Half, Flanker, Full-Back
If you think the hooker has it bad, spare a thought for these three—fly-half, flanker, and full-back. Each role demands a brutal mix of brains, guts, and endurance. Let’s break down what puts these positions on the shortlist for hardest rugby position.
Fly-Half: The fly-half is basically the ‘quarterback’ of rugby. This player directs traffic and makes split-second calls under massive pressure. It’s not unusual for a fly-half to handle the ball more than 50 times in a match. Mess up even one pass and the fans let you know. The World Rugby stats show that fly-halves are involved in more match-defining plays and are tackled more than most backs. Remember Owen Farrell’s icy nerves? That’s what keeps his team ticking.
Flanker: If there’s a fight for the ball, the flanker’s already got a hand in it. They average around 15 tackles per game and cover more ground than most—for some pros, that’s over 7 km per match according to GPS data. Flankers are the first into the ruck and often the last to get up, if at all. Quick reflexes, crazy stamina, and a knack for reading attacks set them apart. Even seasoned coaches say flankers are ‘everywhere at once or get benched’.
Full-Back: Only the bravest sign up to be the last line of defense. It’s the full-back’s job to field massive kicks under pressure, stop charging opponents solo, and then launch a counterattack—fast. Good full-backs jump higher and run farther than many teammates. According to recent tracking stats, some full-backs hit top speeds of over 33 km/h in a match. Imagine catching a ball with 120 kg of muscle flying right at you—it’s not for the faint-hearted.
| Position | Average Tackles per Game | Average Distance Covered (km) | Notable Skill |
|---|---|---|---|
| Fly-Half | 5-8 | 5.5 | Game Management |
| Flanker | 12-20 | 7.2 | Tackling & Rucking |
| Full-Back | 7-12 | 6.8 | Kick Fielding |
Each of these spots asks for very different skills, but none are easy. You need serious mental focus, endless energy, and the guts to take hits most people would walk away from. If you’re picking a position, be honest about what you can handle—these roles are tough for a reason.

Tips for Mastering Difficult Rugby Positions
If you want to thrive in one of rugby’s toughest spots, you need more than guts. Technique, mindset, and smart prep are all massive game changers. There’s a good reason pros say mastering a rough position takes way more than just showing up at practice. Here’s what the experts and seasoned players swear by when it comes to the hardest rugby position and its biggest rivals.
"The biggest difference between a good player and a great one? Recovery and relentless basics. If you can’t nail the fundamentals under pressure, the rest doesn’t matter." – Shaun Edwards, former England rugby league and Wales rugby union coach
Here are some battle-tested strategies for making tough rugby jobs just a bit more manageable:
- Own Your Fitness: The physical demands in spots like hooker, flanker, and full-back are brutal. Try interval training for gas and lifting for injury prevention. Most elite players run up to 7km per match, mixing sprints with constant movement.
- Study Your Position: Knowing your responsibilities is non-negotiable. Watch game footage—not just highlights but messy, real-game breakdowns—and focus on body position, timing, and decisions by pros in your spot.
- Get Your Technique Right: For forwards like hookers, work on scrummaging angles and throwing accuracy. If you’re fly-half, practice setting up plays and tactical kicking under pressure. Even five minutes daily can make a difference.
- Talk and Listen: Communication is survival in rugby’s toughest posts. For example, a full-back who’s silent puts the whole backline at risk. Use clear, loud commands and check in with your teammates after phases.
- Protect Your Body: Use the right tape for joints you hammer most (ankles, wrists, shoulders), stretch daily, and don’t skip ice baths or massages. Hookers and flankers, for instance, are twice as likely to get shoulder knocks as wingers.
- Mental Toughness: Tough spots mess with your head. Many pros work with sports psychologists or use techniques like breathing exercises before games to keep the nerves under control.
To give you an idea of what serious prep looks like, check out this table on typical physical demands for the toughest rugby positions based on stats from Premiership Rugby (2023):
| Position | Avg Distance Covered/Match | Tackles/Match | Scrums/Match |
|---|---|---|---|
| Hooker | 6.5 km | 13 | 14 |
| Flanker | 7 km | 21 | 10 |
| Fly-half | 6.8 km | 8 | — |
| Full-back | 7.2 km | 11 | — |
You’re never truly done learning in rugby, especially in the most brutal roles. Whether you play for fun or chase serious fixtures, sharpen your basics, look after your body, and keep your head in the game—you’ll last a lot longer than the folks who rely just on grit.